User Management
View, organize, and control user accounts and role-based permissions in MXP.
What it solves
User Management is a built-in administration module that gives authorized administrators a single place to view, organize, and control user accounts and their permissions. Access is governed by a fine-grained role-based access control (RBAC) model, so each user only sees and edits the parts of the platform they are responsible for.
When to use it
- Onboarding new users — add or update a teammate's roles so they can access the right feature areas.
- Adjusting permissions — change roles when responsibilities shift, or assign multiple roles to a single user.
- Offboarding — remove a user from the system when they no longer need access.
- Auditing access — review who has which roles, search by email, and check the history log for past changes.
Key concepts
Role-based access control (RBAC) — every user gets one or more roles, and each role grants a specific set of permissions in a specific feature area. Users are never granted permissions directly; permissions always come from roles.
Role naming convention — roles follow a consistent pattern of feature area plus permission level:
| Level | What it allows |
|---|---|
| Viewer | Read-only access |
| Editor | Create and edit |
| Publisher | Publish or activate |
| Approver | Review and approve workflows |
Multiple roles — a user is not limited to one role. Assigning several roles to the same user combines their permissions across feature areas.
Tenant — User Management always operates in the context of the active tenant, shown in the page header alongside the server timezone.
How it works
Accessing User Management
Before a user can sign in to the platform, the mxp-support team must create both the user account and the tenant. Authentication is currently available only through Google SSO, so a Google email address is required. Once the user has been added to the tenant and assigned the appropriate roles and permissions, they can log in.
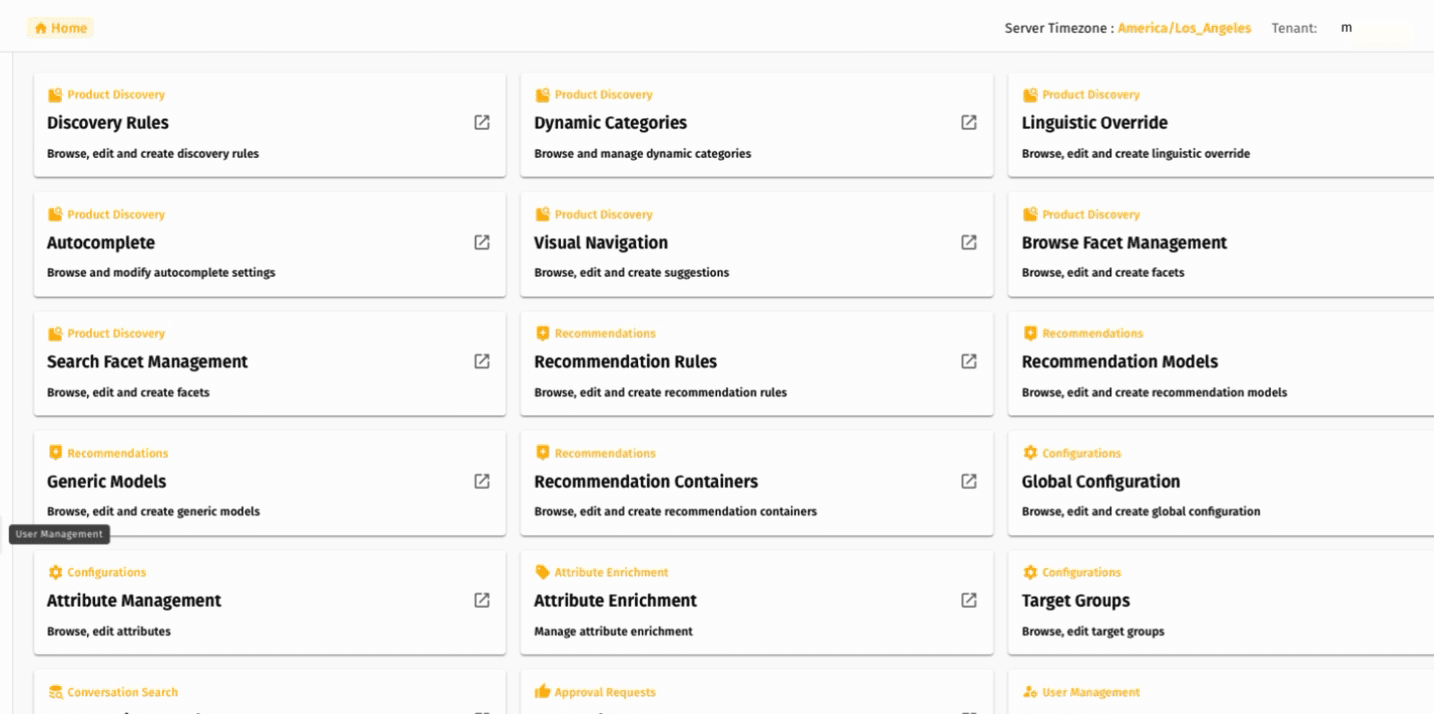
User Management is reachable from the main home dashboard. Every available feature is shown as a titled tile; the User Management tile (labeled "Browse, edit and review users") is in the bottom-right area of the grid. Clicking the tile opens the Users list.
The Users list
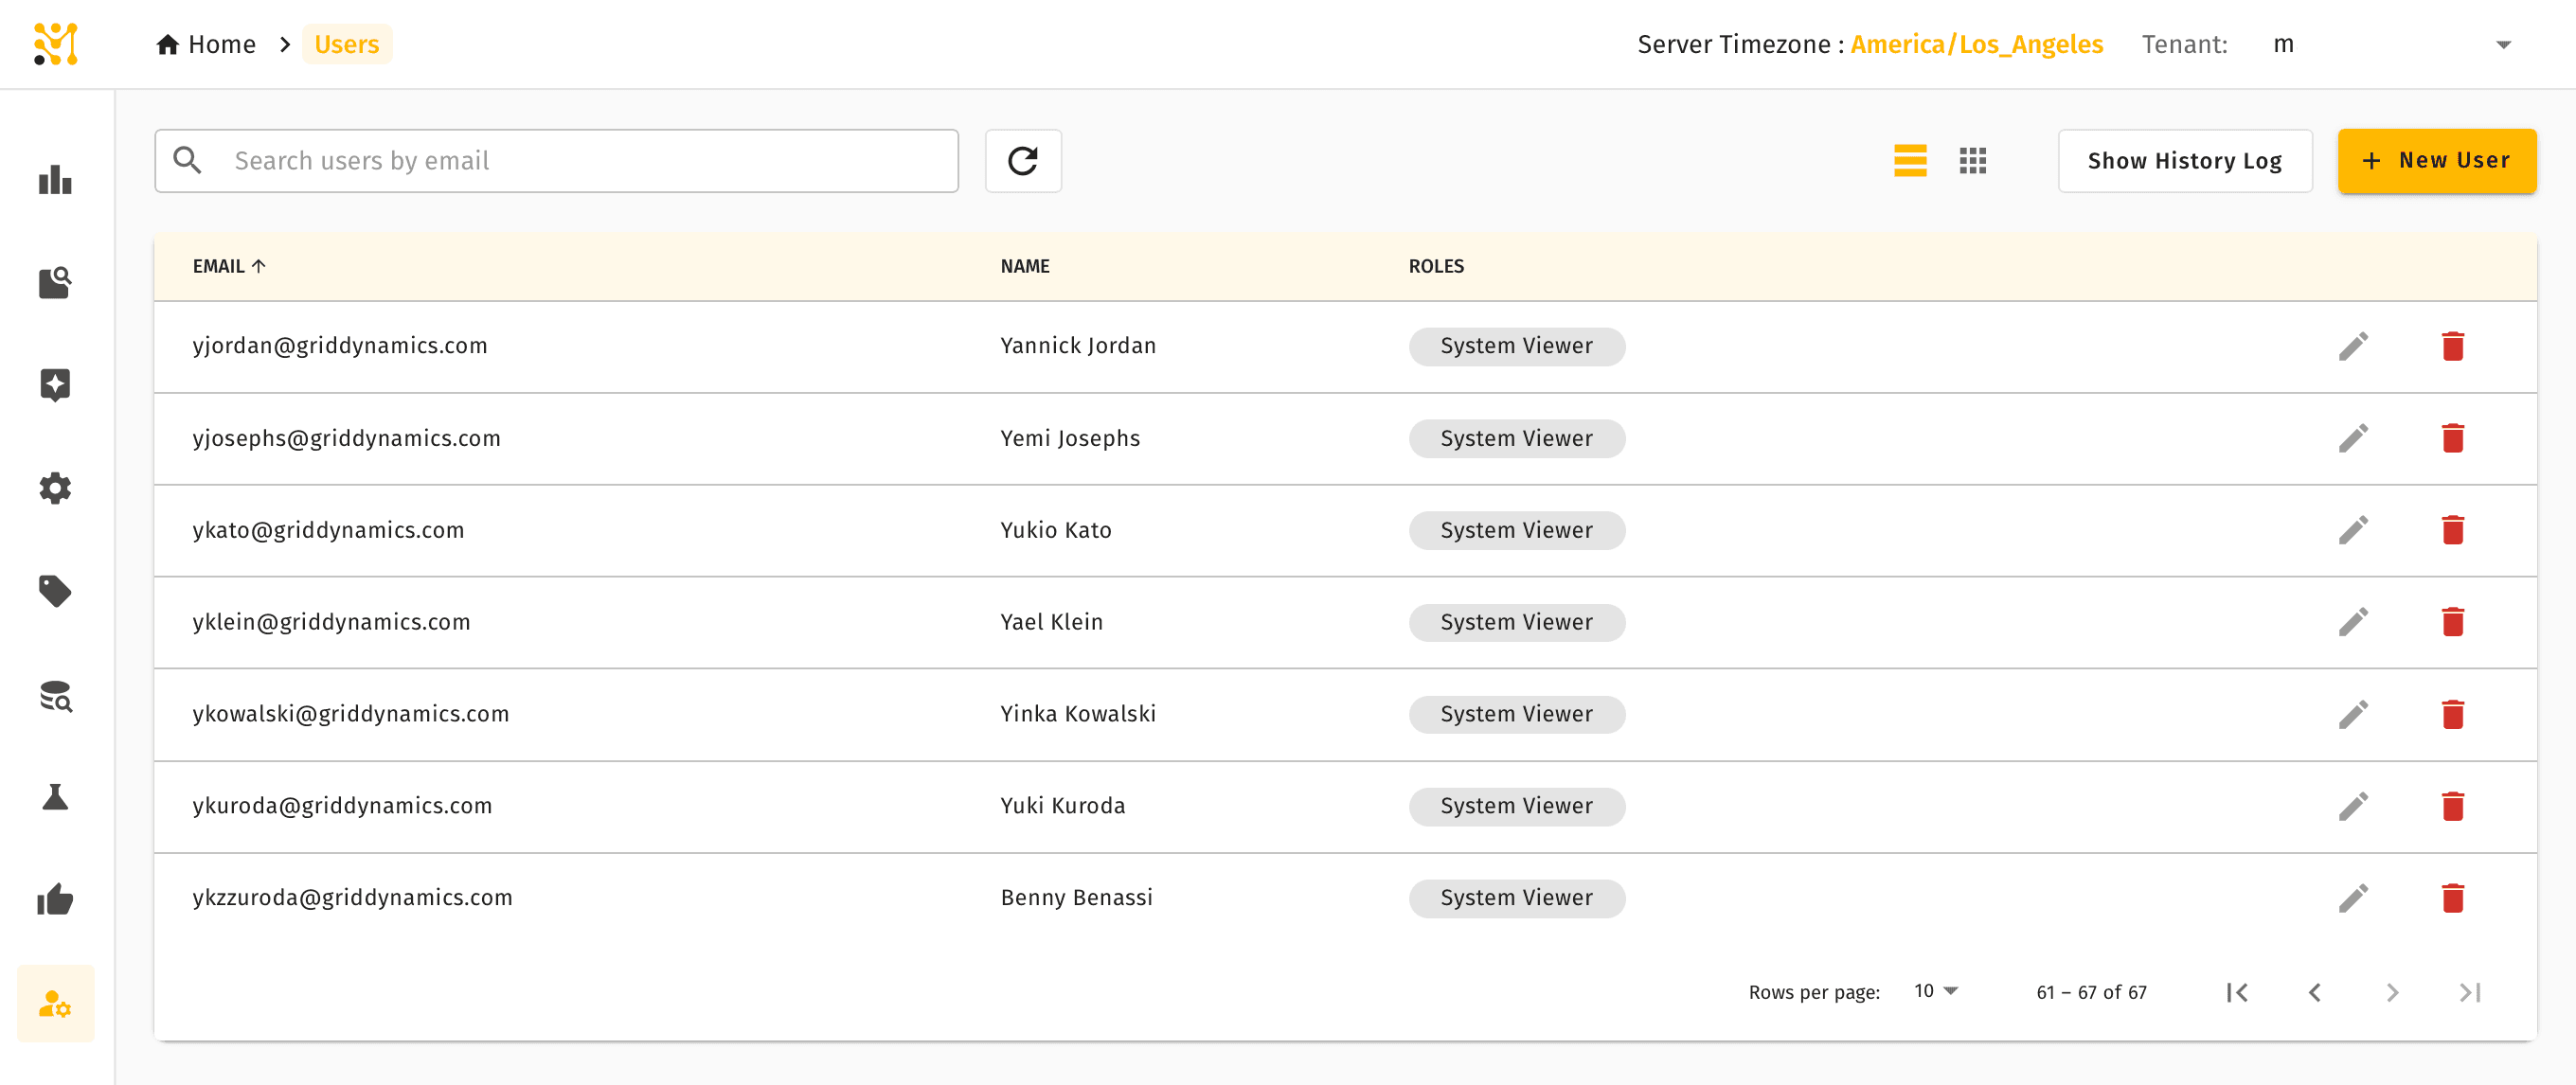
The Users page lists every account registered in the system with three columns:
| Column | What it shows |
|---|---|
| The user's email address. Sortable (ascending by default, shown by the column arrow). | |
| Name | The user's display name. |
| Roles | One or more role badges assigned to the user, shown as labeled chips. |
The header shows the breadcrumb Home › Users, the server timezone, and the active tenant.
Search. The Search users by email field filters the list as you type. The refresh button next to it reloads the user list from the server.
Pagination. The footer shows the current page range (for example, 1–10 of 55) with first / previous / next / last controls. The Rows per page dropdown changes how many users appear per page (default 10).
View options. Two toggle buttons in the top-right switch between a table (list) view and a card (grid) view. The Show History Log button opens an audit trail of user-related changes.
Row actions. Each row has two action buttons on the right:
- Edit (pencil icon) — opens the Edit User panel for that row.
- Delete (red bin icon) — removes the user from the system.
Editing a user
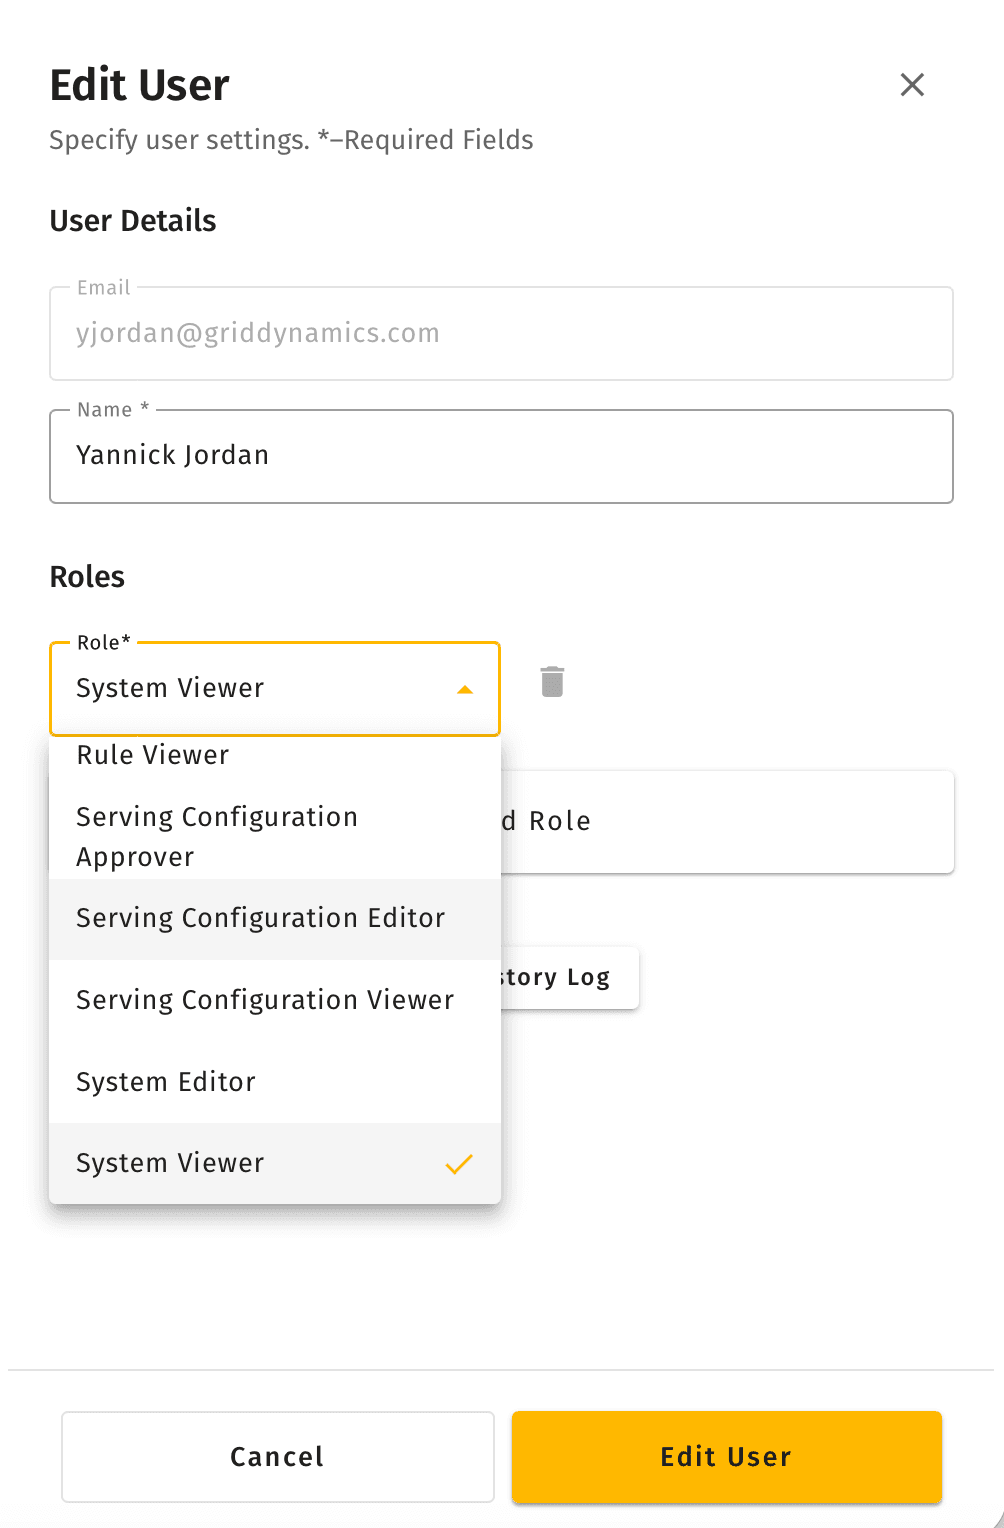
Clicking the pencil icon on a row opens the Edit User panel as a drawer on the right side of the screen. The user list stays visible but dimmed.
The panel has two sections:
User Details
- Email — read-only, pre-populated. Cannot be changed here.
- Name — editable display name. Required fields are marked with an asterisk (
*).
Roles
Each role assigned to the user is shown as its own dropdown with a red delete icon next to it. Opening a dropdown shows a scrollable list of every role available in the system; selecting a different role replaces the current assignment.
Assigning multiple roles
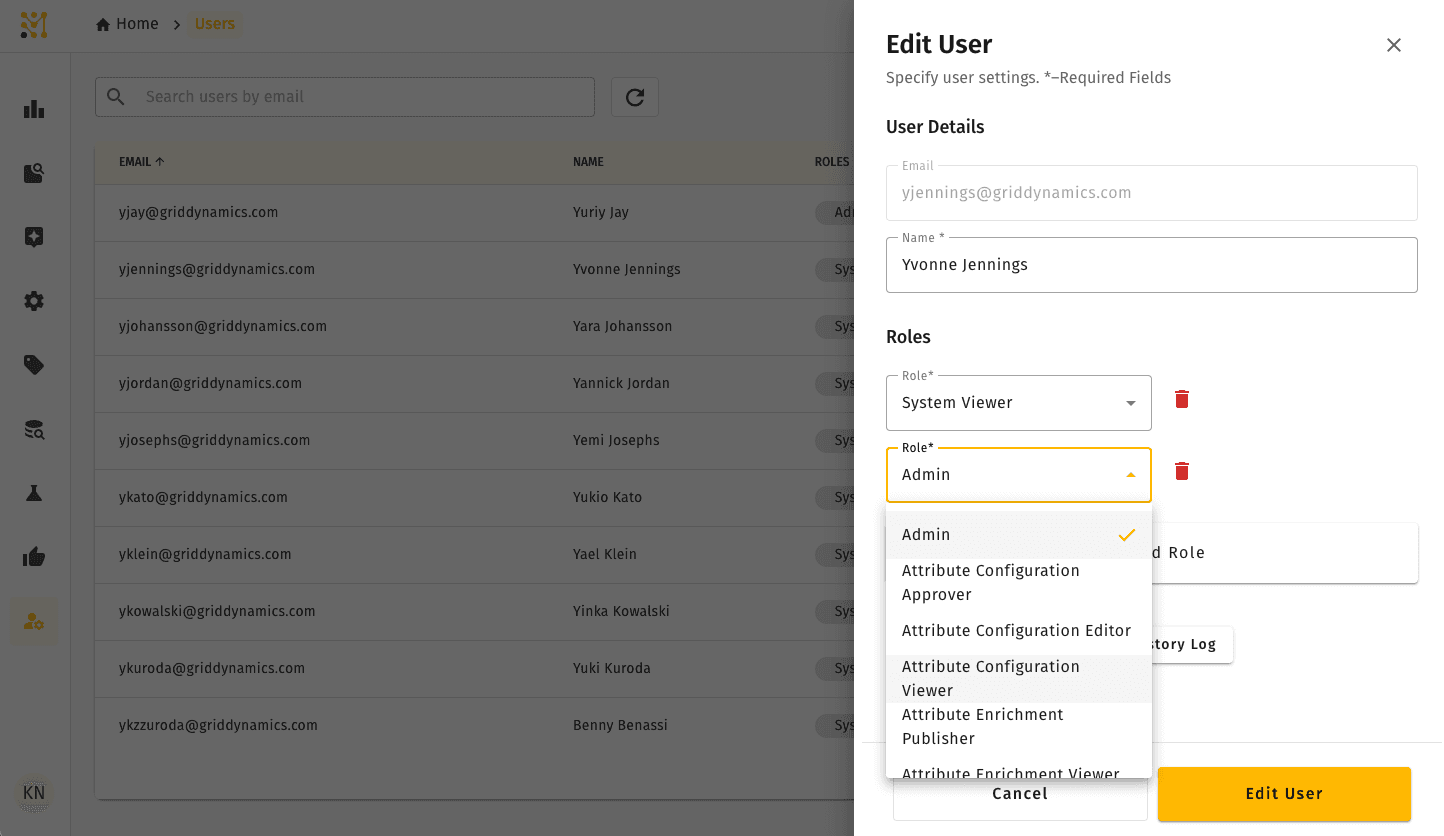
Click + Add Role under the existing dropdowns to add another empty role selector. Each role appears on its own row with its own delete icon, so individual roles can be removed without affecting the others.
Saving changes
The panel footer has two buttons:
- Cancel — closes the panel without saving.
- Edit User — the primary action (highlighted in amber). Saves changes to the name and roles, then closes the panel.
Available roles
The role dropdown exposes a comprehensive list of roles grouped by functional area. Every role follows the feature area + permission level naming convention described in Key concepts.
The full set of roles currently visible in the system:
| Feature area | Roles |
|---|---|
| Platform-wide | Admin, System Editor, System Viewer |
| Attribute Configuration | Attribute Configuration Viewer |
| Attribute Enrichment | Attribute Enrichment Publisher, Attribute Enrichment Viewer |
| Autocomplete | Autocomplete Approver, Autocomplete Editor, Autocomplete Viewer |
| Dynamic Categories | Dynamic Category Editor, Dynamic Category Publisher, Dynamic Category Viewer |
| Facet Management | Facet Management Approver, Facet Management Editor, Facet Management Viewer |
| Linguistic Overrides | Linguistic Overrides Approver, Linguistic Overrides Editor, Linguistic Overrides Publisher, Linguistic Overrides Viewer |
| Models | Models Approver, Models Editor |
| Rules | Rule Publisher |
| Serving Configuration | Serving Configuration Approver, Serving Configuration Editor, Serving Configuration Viewer |
| Target Groups | Target Group Approver |
Role assignments take effect immediately on save. Removing a role does not delete any content the user previously created — it only changes what they can do going forward.
Quick example
A new analyst joins the team and needs to review enriched product attributes without editing them.
- From the home dashboard, open User Management.
- Find the analyst in the Users list (use the Search users by email field if the list is long).
- Click the pencil icon on their row to open the Edit User panel.
- In the Roles section, open the role dropdown and select Attribute Enrichment Viewer.
- Click + Add Role and assign Autocomplete Viewer so they can also review autocomplete behavior.
- Click Edit User to save.
The analyst now has read-only access to both feature areas the next time they sign in.
User Management is available in Lightweight mode, without Target Groups and with a reduced role list — see what differs.